Support.cc is an all-in-one helpdesk system that can assist you in building a reputation for providing superior customer support. Additionally, it streamlines the management of your issues and relationships. This software centralizes all of your contacts' information, making it simple to keep, organize, maintain, and update as needed.
Support.cc is a help desk support software that helps to resolve and manage customer issues on multiple channels, create a brandable knowledge base, automate SLA workflows, integrate with CRM.io, and support various messaging apps like Live Chat and Chat Bot.
If you think about help desk software and you might be thinking of customer service or IT-related customer support, sales, business owner, entrepreneur, or anybody who has any issue that needs to be resolved. There are also other features that you can use, like a knowledge base, help desk automation, advanced reports, and task management.
With that said, even self-owners think why would I use it? Why would I send myself to resolve This is the kind of organization just in case. if u get these things done and resolved We have been able to keep track of these things going back years and check these things have been resolved before. And go back to this similar issue and be like ok. We have somewhere restored it and now I have a knowledge base from which I can learn that as well. This can be basically used by anybody.
With that said, you have a business running or you may be handling all problems. What’s good if you can't resolve all the problems in an effective way? This can save time and money and u can have more credibility
Go to infinity.500apps.com > Find Support on the top section of the suite

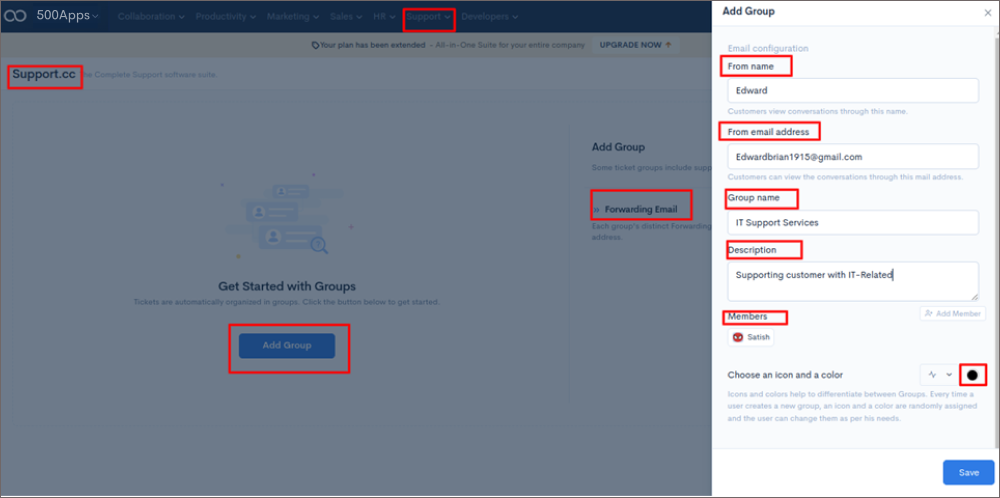
Select Support.cc CLick > Add Group > Enter Name, Description > Add Email by clicking the Add Member
you'll also find guidelines for forwarding emails. Let us proceed and begin
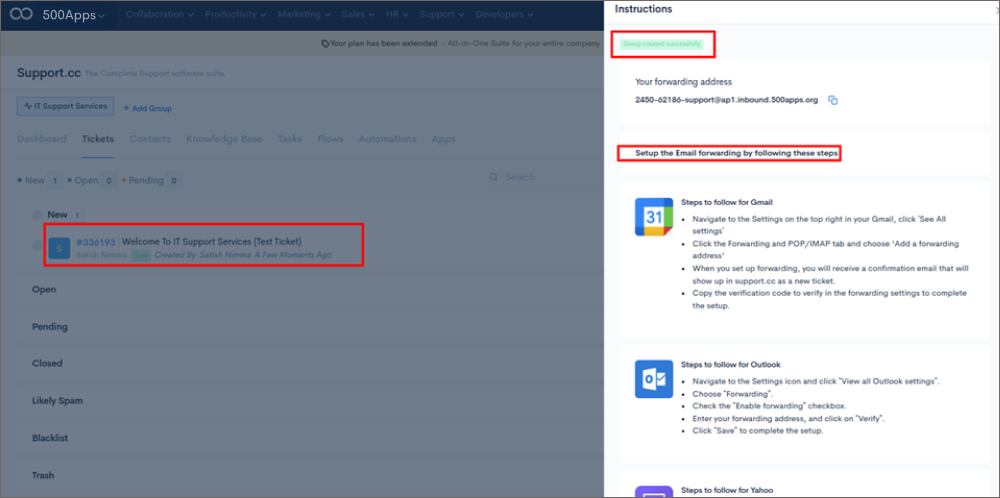
Your Add group has been created let's go and get started
Outsourcing your appointment setting can be a great way to save time and money. It can also help you get the best results for your business.
Another benefit of outsourcing is that you can focus on your business while the company takes care of the appointment setting. This can free up your time so that you can focus on other aspects of your business.
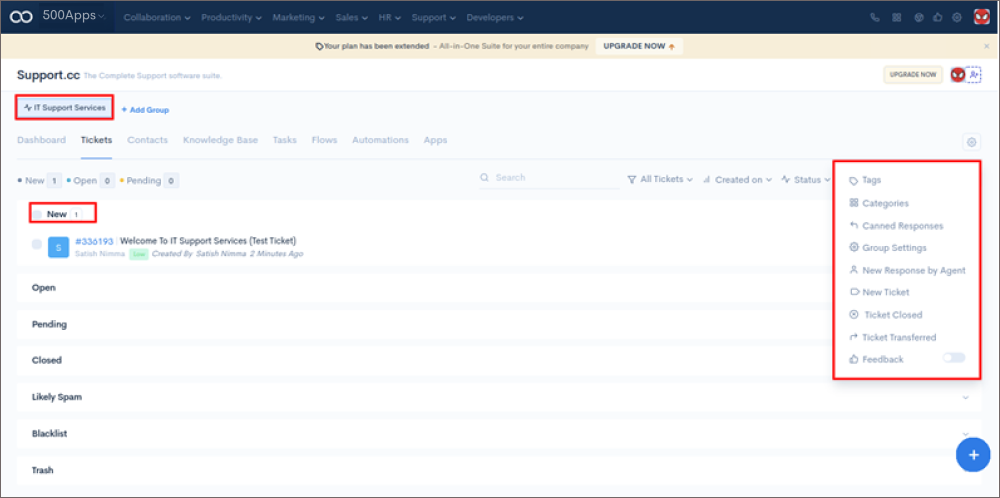
You can check the setting for support.cc
Tags; Categories; responses; New Response by Agent, closed/transferred tickets; and feedback.
CLick > Support.cc > Group > Select Settings
The Tags Settings page allows you to configure how tags are displayed on your Function. You can choose to display tags as a list, a cloud, or both. You can also specify the number of tags to display, and whether to display tags in alphabetical or random order.
CLick > Support.cc > Group > Tags
First, Add Tags. You may add a tag and write its name there

Categories, status, priority, source, and type are all fields that can be used to help organize and track tasks in a project management system.
Categories can be used to group together similar tasks, status can be used to track the progress of tasks, priority can be used to indicate which tasks are more important, source can be used to track where a task came from, and type can be used to indicate the type of task.
Go to > Support.cc > Click on your Function > Settings > Categories > Add Category, Source, Priority, Status.
Next, we'll add categories. The algorithm has already created several categories for us. These include priority (high), source, and kind. When using pre-made replies, we may select from a selection of pre-written responses or compose our own.
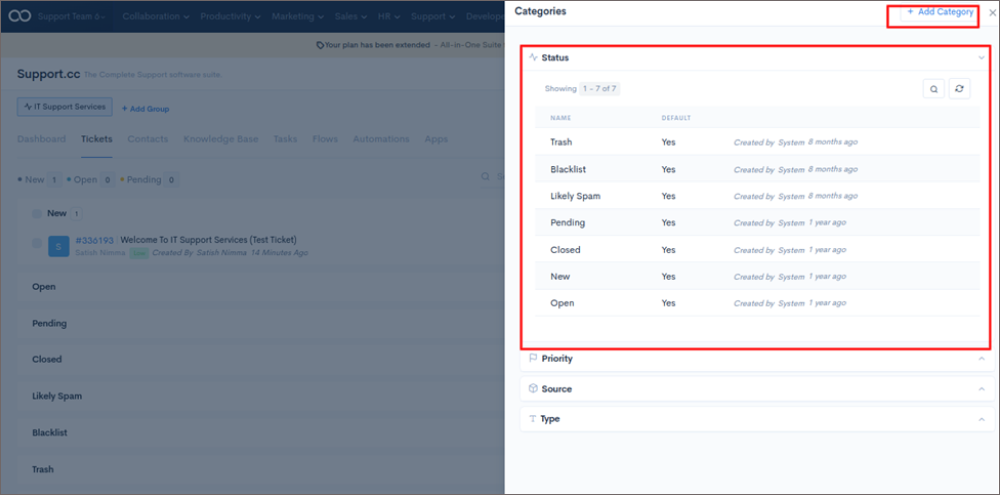
We can Check Status Like Trash, Blacklist, Likely spam, Closed, New, and Open.
You can Add sources like Agents, Email, Phone, Twitter, and Facebook.
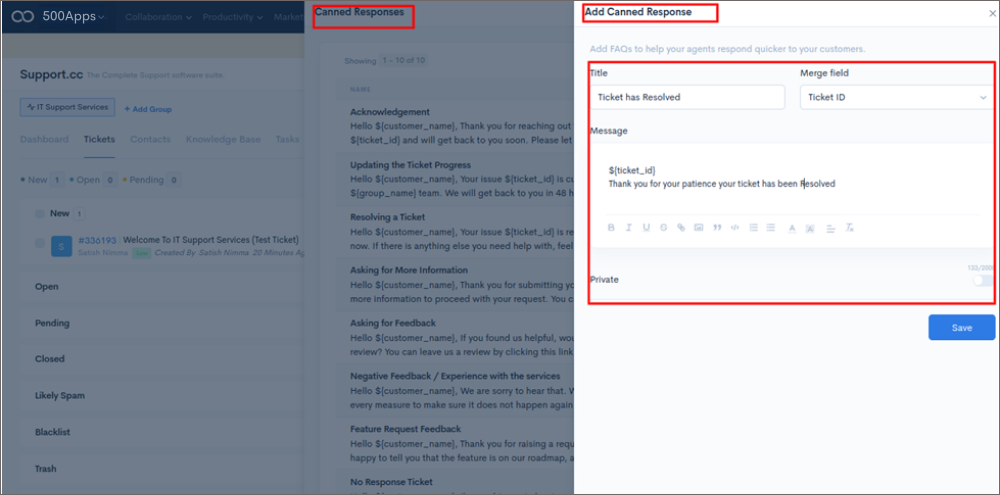
Canned responses are a great way to save time when responding to common inquiries. With canned responses, you can create templates for frequently used responses and insert them into your messages with just a few clicks.
Go to > Support.cc > Click on your Function > Settings >Canned Responses > Add Canned Responses, Title, Manage Field, & Message.
You can go back to your Settings and check the Canned Responses Acknowledgment, Updated Ticket progress, Resolving Tickets, and More.
This is a Quicker Response on how to get into it.
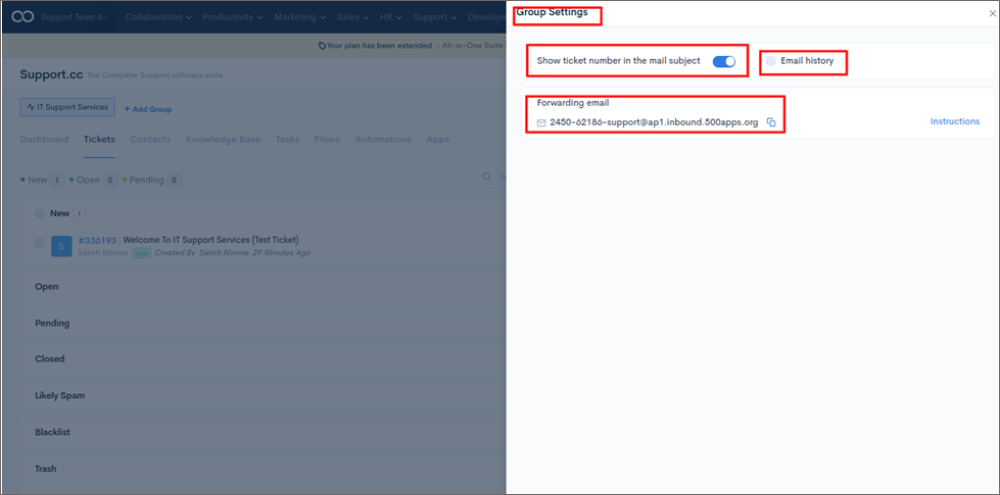
In the Group Settings page, you can set up forwarding for your group's email address, retain email history, and add or remove group members.
Go to > Support.cc > Click on your Function > Settings > Click Group Settings > Show Email History, Forwarding Email, Show Ticket Number in the mail subject
Now go to the group settings. We can see how to include the ticket number in the subject line, forward emails, retain Email history here and copy your email address, and save it.

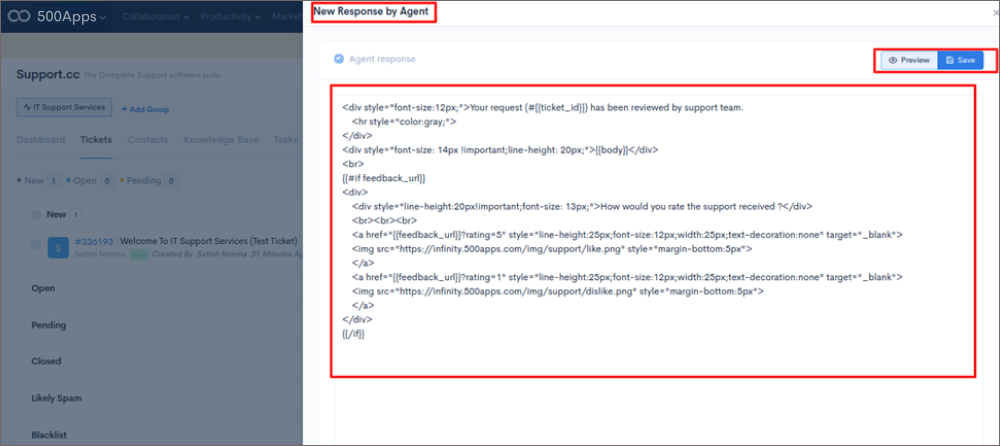
Go to the new Responses by the Agent This section allows you to alter the HTML code that displays your support response. The same goes for closed and transferred tickets; decide if you like them or not. Close it.
Go to > Support.cc > Click on your Function > Settings > New Response Agent > Preview Agent Response & Save it.
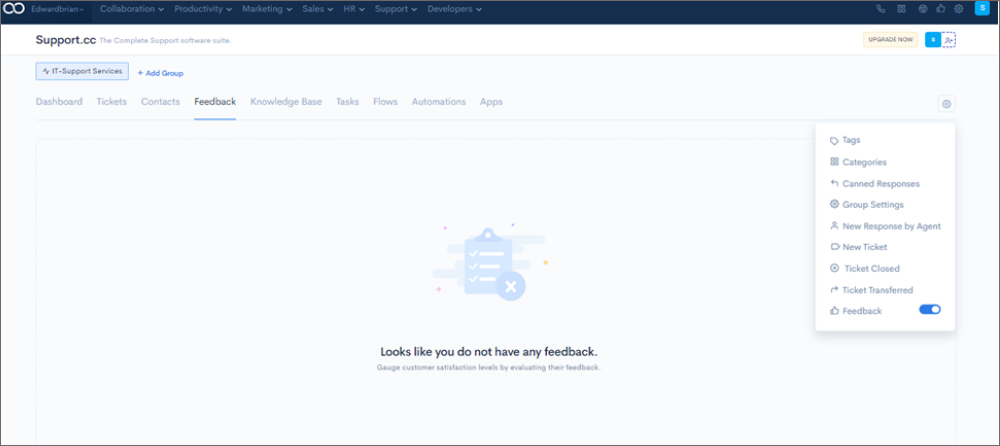
Go back to the setting and turn Feedback on or off If Feedback is turned on you can see the feedback symbol on your particular Dashboard.
Click on your Function > Settings > Feedback > Turn Feedback on.
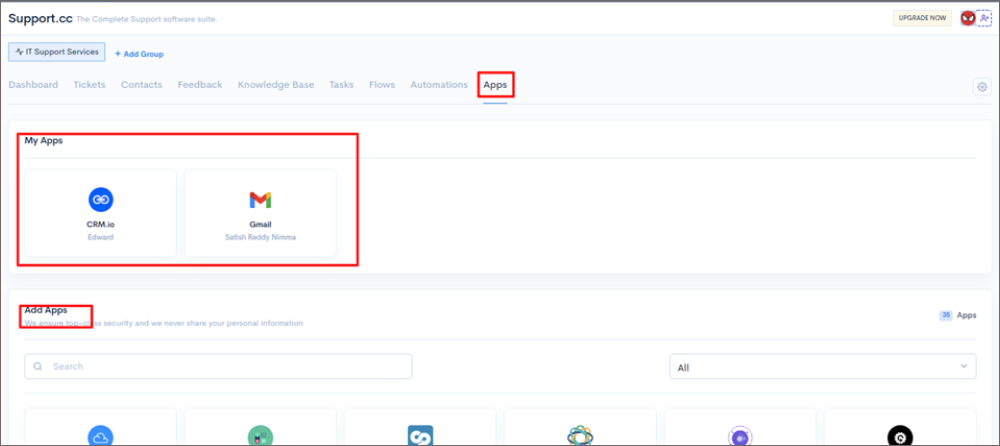
Integrating your app with Gmail and social media platforms is a great way to increase its reach and visibility. There are a few different ways to go about doing this, and the best approach will depend on your specific app and goals.
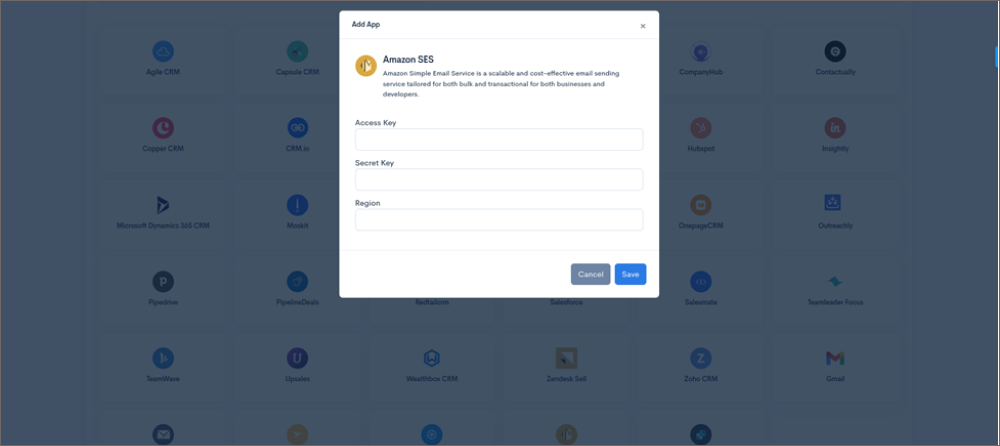
Click App > Integrate to your Support.cc With that said here are some of your favorite apps Agile CRM, Amazon SES, Gmail
Now, we will cover the Apps feature in the infinity Dashboard.

To integrate Amazon SES, we can act to Access key, Secret Key, and Region Which you can find in your Amazon SES setting.
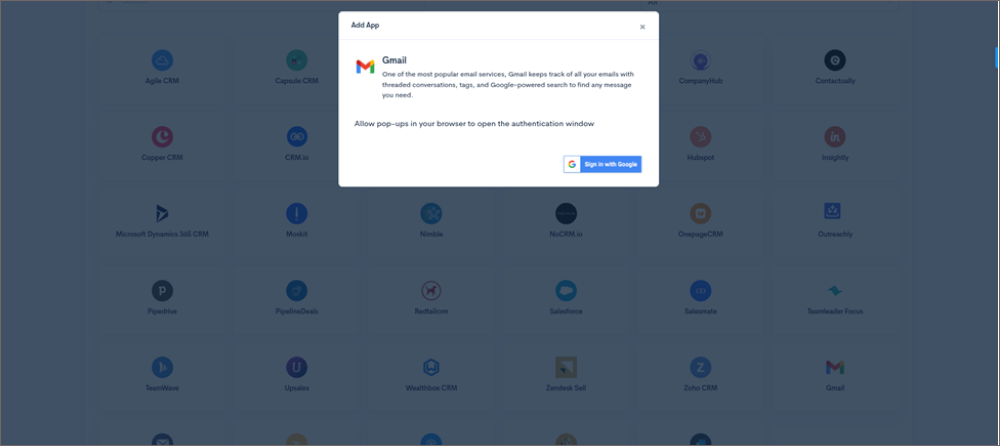
For Gmail, you may just authorize one click and you’ll be signed in. you can add different types of Apps that will integrate with Support.cc beyond look out for more apps we are going to integrate in the future also is the lookout for how been implementing the integration process for some or the other apps we speak with each other when comes to support.cc
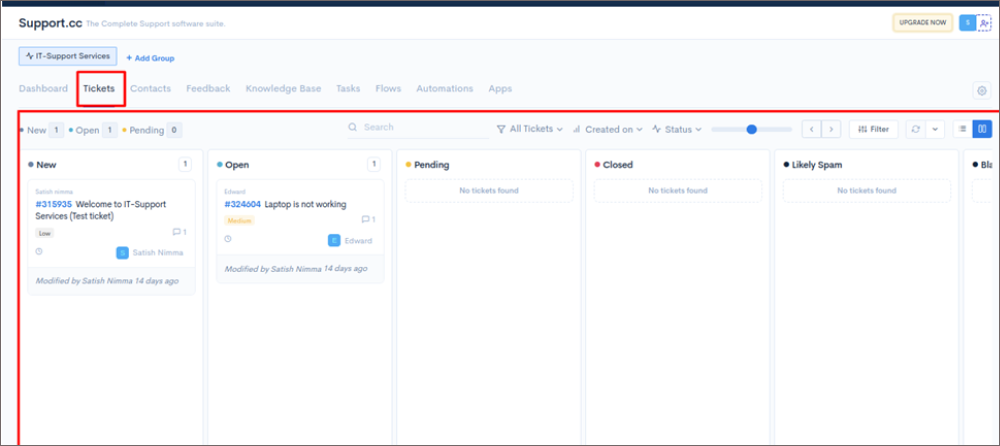
This session shows how support.cc provides an option to manage all your tickets in one place through the tickets tab. You will experience adding tickets, new, open, pending, status, closed, search tickets, list view, grid view, pending, closed, likely spam, black list, filter, etc.
Click on tickets to get there, so what we’re going to be covering Some of the features as well as some of the things that we can do here You can search for your tickets and new tickets. Whether it is created or signed tickets.
Also, filter, and sort it by create, Data uploaded, Updated data, status priority, due date, status priority, source, or type.
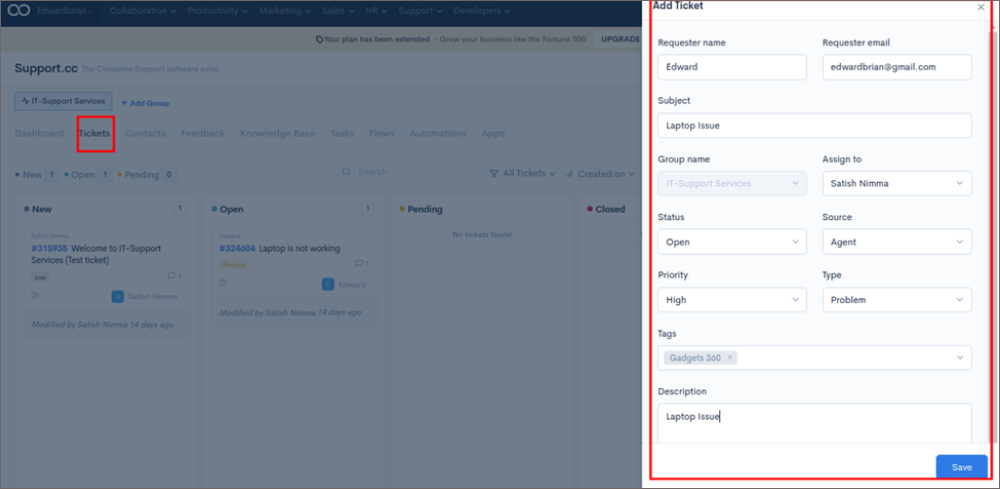
Click Tickets > Add Tickets.
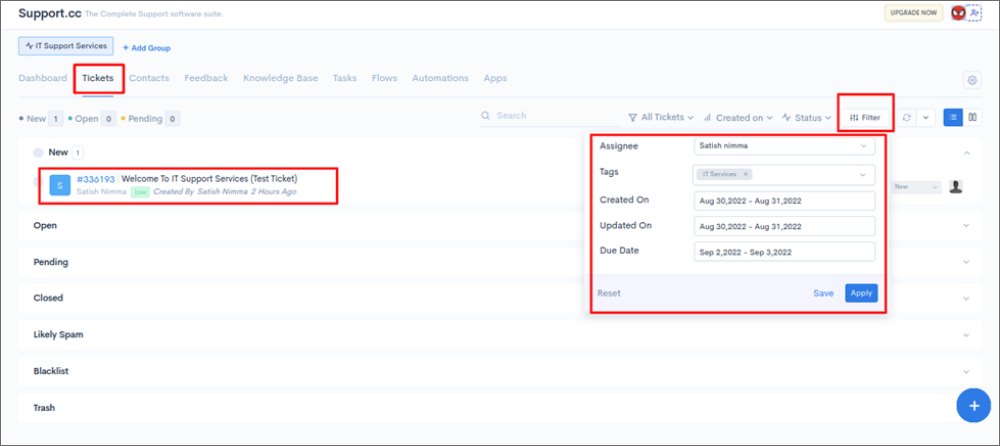
You can access the kanban view. so go ahead and click. You can see Tickets like New, Open, Pending, Closed, Likely spam, and Trash tabs. Add a ticket right here whether it could be a new ticket and you can add a ticket manually as well
Add a ticket right here whether it could be a new ticket and you can add a ticket manually as well.
Let's go back and check the ticket List view, You can create another ticket in the same way as well
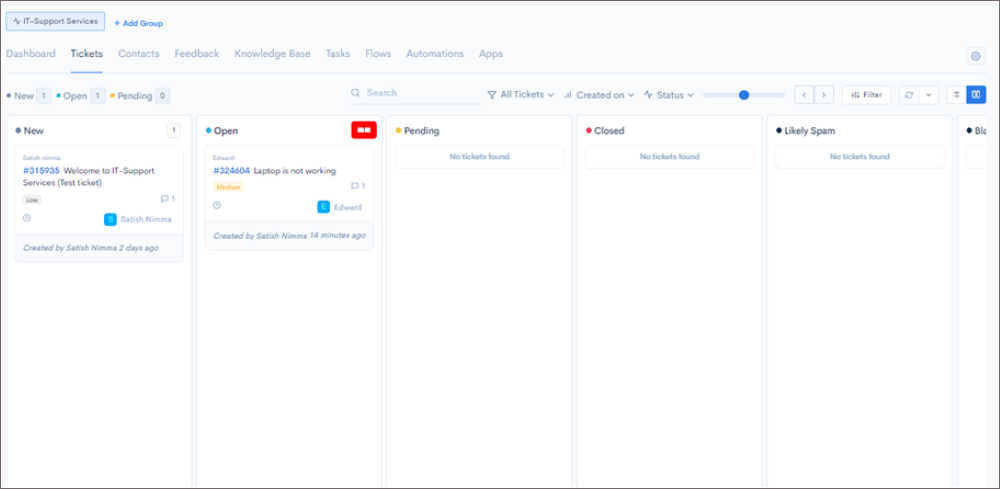
With that said, if you are on a ticket if you want to resolve to click on more
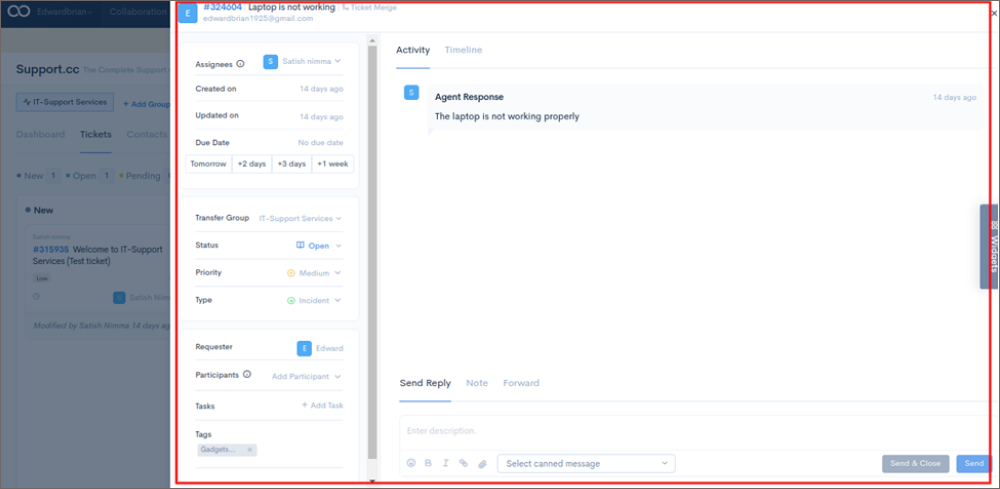
Let's go ahead and check this. You can see a bunch of stuff here, left-hand corner u can see the name, created on, and the due date we can add a specific timeline. This is the group name that you can add, support sales, which is relevant to you. Can check if the Status is open, closed, pending, or likely spam,and priority will depend on the medium,low, and high. We can add participants such as manager
We can see activity on the right side, a timeline of what is going on with this ticket and how long it is being managed, and who is working on this ticket. Send in reply we can forward a reply as well as we can send an email as well And I hope this was an informative Session for you and that you're able to move forward with creating tickets and being able to resolve them in the future.
The contact management feature helps to keep track of the contact’s information and also helps to manage the interactions with them. It also provides features such as contact lists, email distribution lists, publishing calendars, contact history logs, etc. In this session, we are going to cover the contacts tab in support.cc
Click on the contacts tab mainly u can see your customers who are working with, you can also filter first name, Email, and created date, we can create contact manually.
Click Support.cc > Contacts > Add Contacts
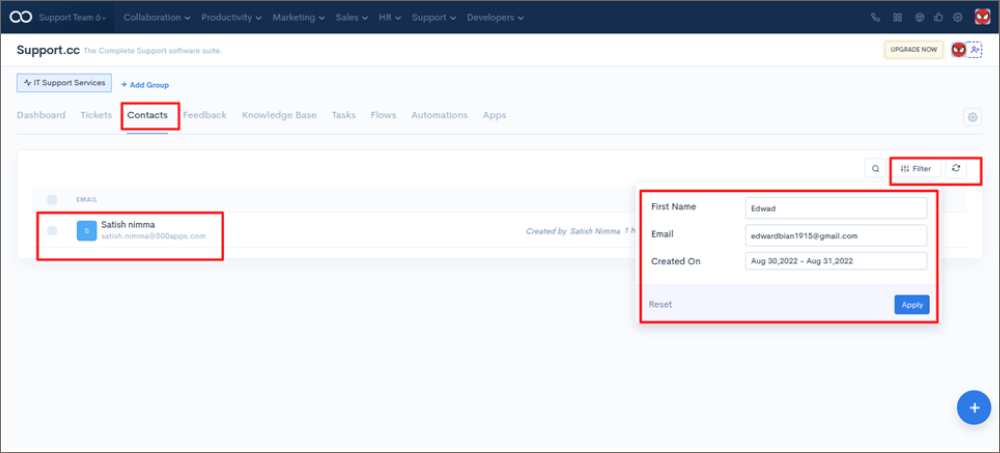
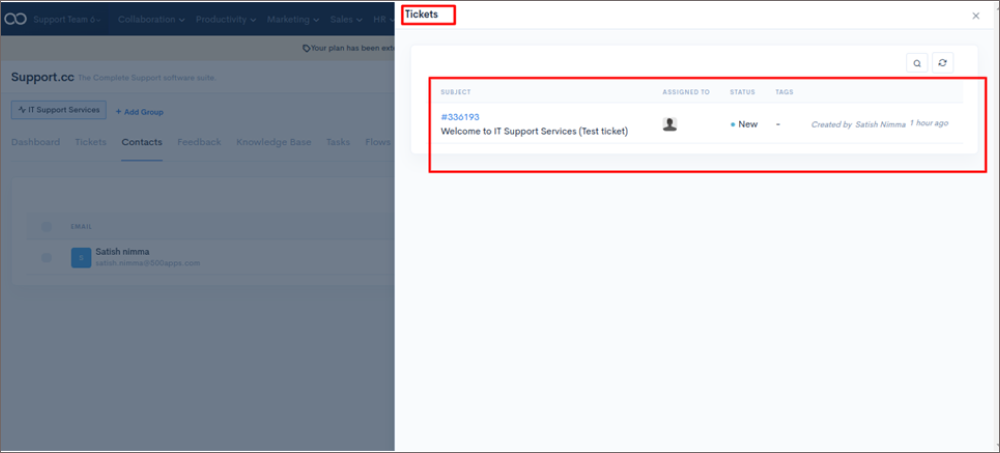
Click on the Contact Name you can see, which ticket you are working for, and thus conclude for the contacts tab.
It is a kind of library of all the information we can learn and able to put together for your team's reference back to understand how to fix the problem.
In this session for support.cc we are going to cover the Knowledge base and u can see it in the dashboard
Click Knowledge Base > Add Article and Description
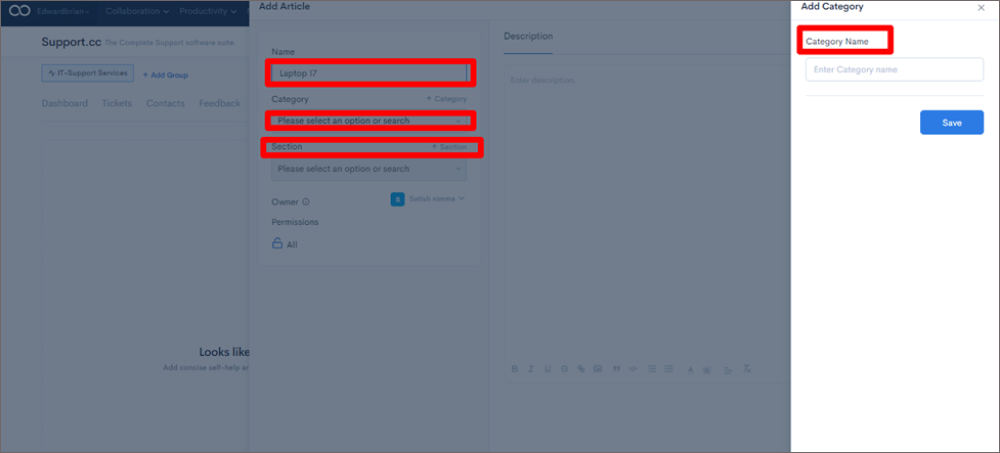
Select Add article, Fill in the Name, Add a Category, Select Section, Enable/Disable Visibility, Add a Description about the Article, and Save the Article.

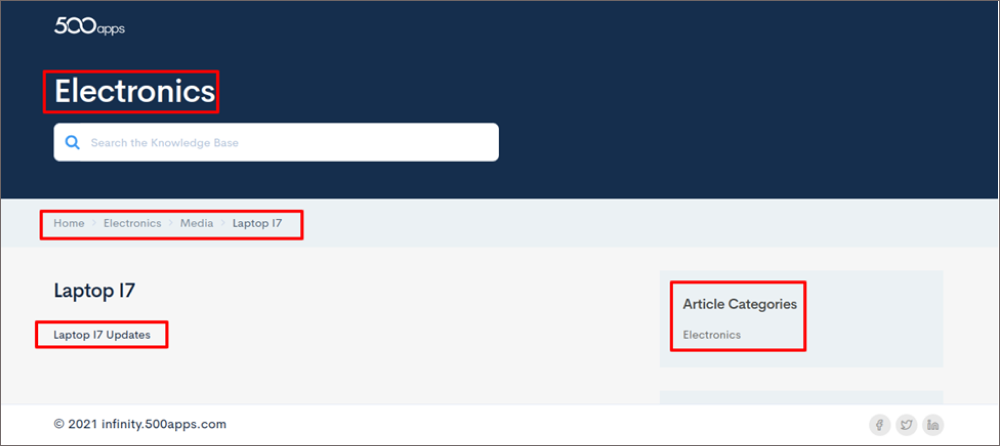
Click Knowledge Base > Select Article You can preview the article live and in offline mode With that said you can check filiters when the article is created, created by,company, section, & updated on
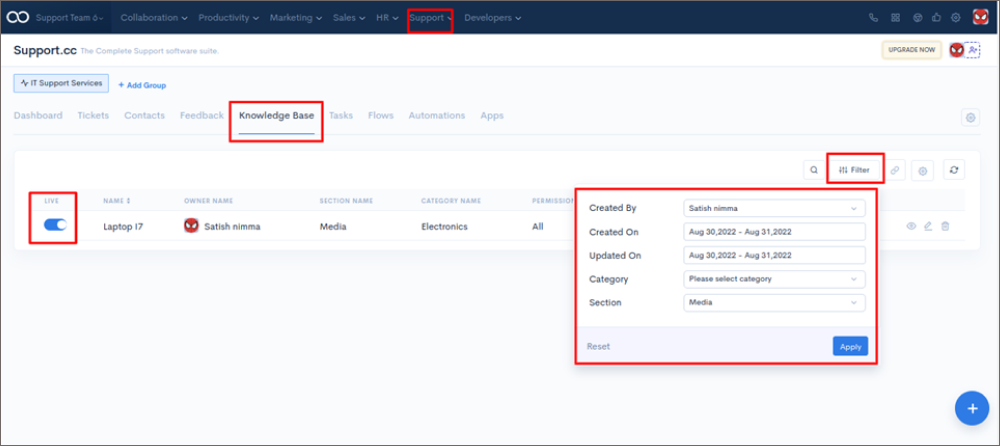
It is a knowledge base it has something This is a laptop I7 article previewing it. you can preview the article, and edit or delete it.
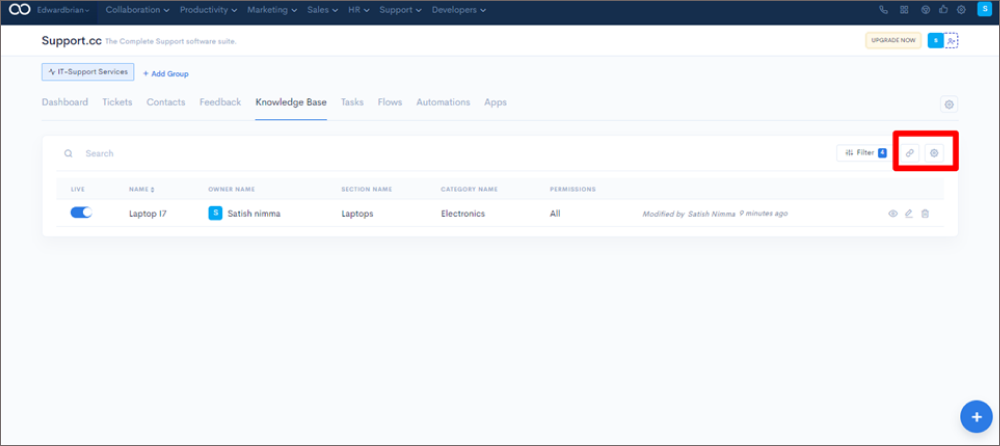
You can see C Name and setting right side corner You can change the domain name to your company name using a CNAME link.
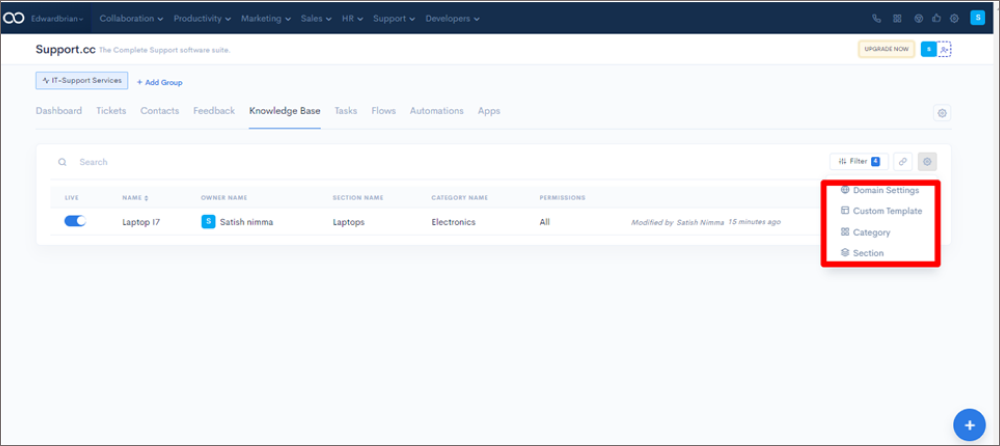
Additionally, you can change the custom templates. As well, you may modify and delete categories and sections. You can add another article manually by clicking the + button right corner of the page. That's everything about the knowledge base.
Click Knowledge Base > Custom Template, Domain Setting Additionally you can create Categories, and Section
Make your knowledge base very knowledgeable and your team able to learn a lot.
Customer satisfaction is important to businesses because it gauges how well the company is doing in terms of providing products or services that meet customer needs and expectations.
There are various ways to measure customer satisfaction, but one common method is to evaluate customer feedback. This can be done through surveys, interviews, focus groups, or other research methods.
Customer feedback can provide valuable insights into what customers like and don’t like about a company’s products or services.
In this session for support.cc viewing feedback tab In addition, you can enable and disable the feedback feature. The customer's feedback can be searched and filtered. Additionally, you can email the customer about their feedback.
Workflows are often created in order to automate repetitive tasks so that they can be completed more quickly and efficiently. In some cases, workflows can also be used to reduce the workload of agents by focusing on critical tasks. By automating repetitive tasks, workflows can help to improve productivity and efficiency.
Go to Support > Click Support.cc > Flow > Select Add Flows
In this session for support.cc Viewing Flows. Generate Flows for repetitive tasks, reduce agent workload,and increase productivity by focusing on Critical Tasks.
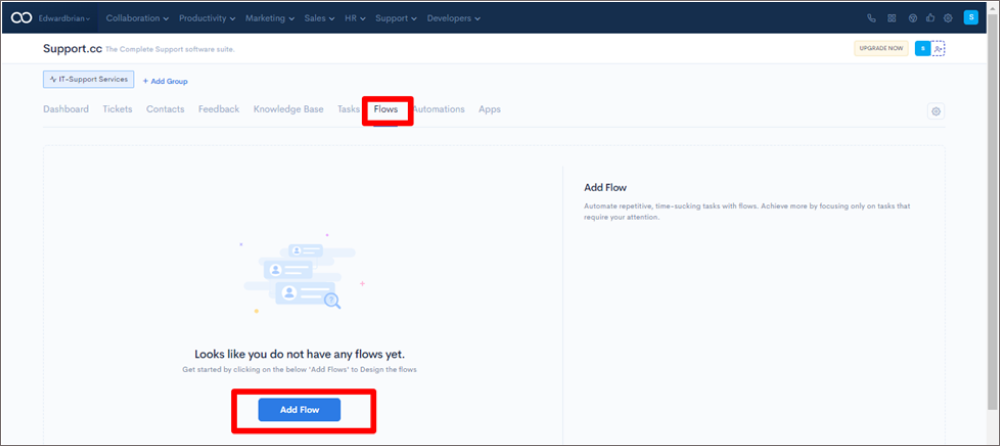
Login 500apps > Go to Support > Select Support.cc Click Flow > Select Add Flows As u can see All of the Templates Pick built-in templates to get started in seconds Status Closed, Priority Low Tag: for a New Ticket
We have a custom one Try to create one custom ticket as follows all of the different things visual builders
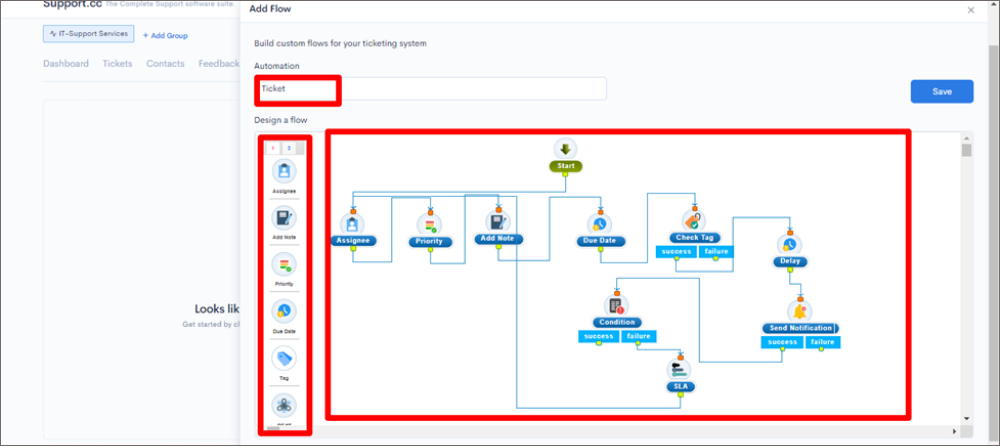
Showcasing you all the notes you can use in the visual reminder design you can create a workflow.
The word “automation” can mean different things in different contexts. Here, we’re talking about business automation, or the process of using technology to automate tasks that would otherwise be performed by human beings.
In this session for support.cc. We are going to cover the automation details that can be created and stored. Login 500apps > Go to Support > Select Automation Click Add Automation > Select an Automation based on the Trigger
To add automation, select the trigger name as either when the ticket is created or when the ticket is updated.
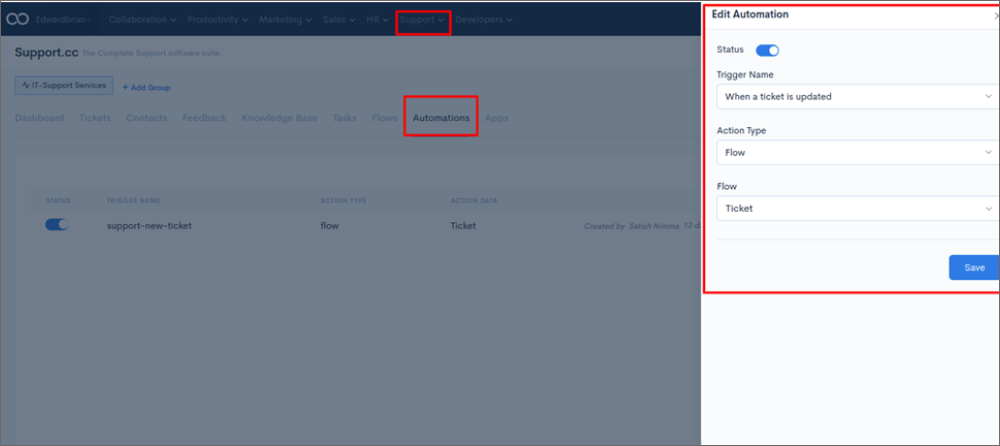
Select the action type as Webhook or Flow, then save the Automation. The Automation can also be Activated or Deactivated
A Dashboard is a way to organize and view information. It is usually made up of many different charts and graphs. To make an interactive Dashboard, you need to add interactivity to the charts and graphs. This can be done by adding buttons, drop-down menus, and other interactive elements.
A dashboard is a place where you can see all of the details you need about something at a glance. You can use a dashboard to see how well something is performing, view statistics, and identify trends.
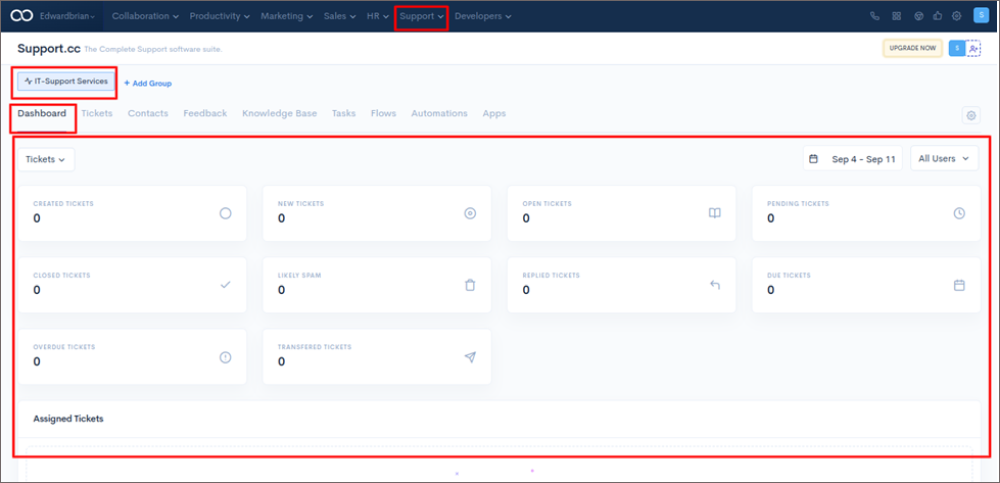
This session shows how support.cc can keep track of reports using the dashboard tab. In the dashboard, Among the features you'll see is a report card for u r tickets, new tickets open tickets, and closed tickets, you can download it in png, jpeg, and print. You can also filter feedback and contacts.
Go to Support > Select Department > Click * Dashboard* > View and Track of Reports in Dashboard
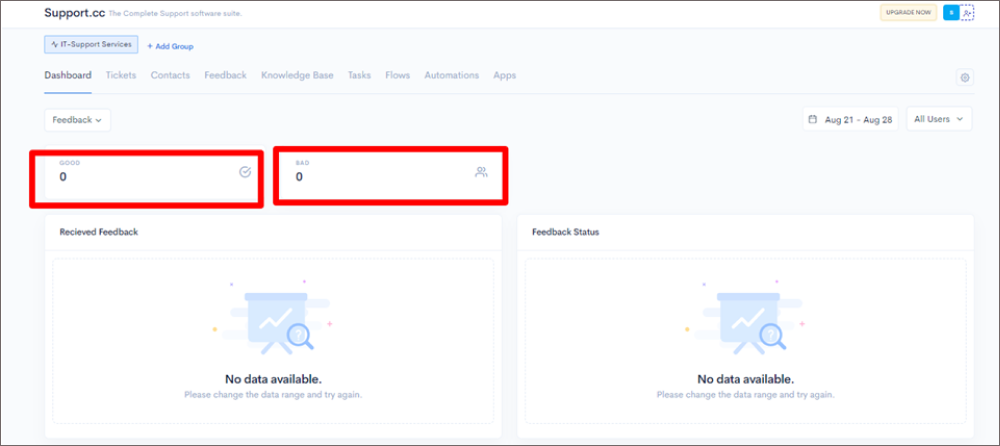
In the feedback, we look into good or bad feedback. We can download and receive feedback Login 500apps > Go to Support > Select Department Click * Dashboard* > Select on Ticket and check Feedback Option
In the Contact, we look into contact information. Contacts by source We can download them in pdf,& jpeg and print it on paper
With that said this was the dashboard I hope this information will is useful to have a fortune 500 day
Go to the next level with ![]()
Get 50 other apps with Support.cc - Join the SaaS Revolution - 500apps, $14.99/user flat pricing, 24/5 Support (Phone/Email/Onboarding)
